Sunday, February 24, 2013

Luxurious Low(er)-Fat Cheese Cake

 Cheesecake. A romantic, tantalizing dessert. I remember the time I ate at Cheesecake Factory. I died of happiness. Unfortunately I had a State Cross Country meet the next morning so they had to revive me. But it was amazing. Surprisingly I didn't eat any cheesecake, so I can't praise their work. But if it was half as good as the rest of the food, man oh man....
Well, I've never made cheesecake. I love cheesecake but I know, even as someone who never counts calories, that this dish can destroy a diet. It just so happened that one of the best recipes I found (from foodnetwork) was low fat. I was intrigued. I couldn't believe you could get anywhere close to that dream taste while subbing the ingredients....
Well. Turns out you can! Ta-Da!

Bake Temp: 325
Prep Time: 20 minutes
Bake Time: 50 minutes
Cool/Sit Time: 3 hours
Ready-In: 4 hours
  
For Crust
12 whole sheets graham crackers
3 tablespoons granulated sugar
3 tablespoons water
2 tablespoon melted unsalted butter
For Filling
3 ounces semisweet chocolate
24 ounces 1 percent cottage cheese
8 ounces 1/3 less fat cream cheese, at room temperature
3/4 cup granulated sugar
1/2 cup unsweetened cocoa powder
2 tablespoons all-purpose flour
1 egg
2 egg whites
2 tsps vaniller
Begin with your crust. To make a nice cheese cake you're going to want a very special kind of pan. It's got this fancy old spring release thing on the side, so the wall comes off and your cheesecake will just appear when ready.
 Look how nice and fancy that is! I'd really recommend one if you want to make a respectable cheesecake.

So. For the crust. Begin by heating your oven to 325. Gosh, that's low, you might say. Well, the lower the better. Longer bake time means a more moist filling. Anyways,  blend your graham crackers until they resemble nothing less than a powdery fairy dust.


Then mash in the other three crust ingredients. Butter the sides of your pan. Push the crumble into the bottom evenly.


 Place in the fridge to harden and cool. In the meantime make the filling. The crust needs at least 15 minutes to sit, so keep that in the back of your mind.
This is real simple. I promise. Take out your biggest blender (the magic bullet ain't gonna cut it here). Blend the bejeezus out of the cottage cheese. You want the smoothest, silkiest puree you can get.  Now blend in the cream cheese, sugar, cocoa powder and flour. Prepare your egg white. Dump in and blend until smoooooooooooth.


When the crust is ready, having chilled for at least 15 minutes, pour filling into crust evenly.


Microwave the semi-sweet chocolate until melted. Gently pour over the top of the cake. I made a straight line, then ran a toothpick through it to make my design.


 Fill a casserole dish 1/2 way with water, put on lower shelf. This will serve to keep your cake nice and moisturized through the baking.
 

 Bake at 325 for 45-55 minutes. Be VERY mindful not to over bake. It will continue baking once it has been removed from the oven, so you want the center to still be jiggly. After 45-55 minutes, with a center still jiggly, turn off oven but LEAVE THE CAKE INSIDE! YEAH. For one hour. NOW you can remove it. Run a knife around the edge of the pan to loosen everything up. Let sit for 2 hours, then put in fridge until desired munching time.

 Decorate as you please, I recommend strawberries and raspberries!


Be careful of munching papa's.


Wednesday, February 20, 2013

Petit Fours

I'll be honest, I had no clue what to make today. I'd been thinking about it all week. Usually I have classmates giving recommendations, but this week is break, so anything I make today won't be spreadable to my classmates. With Sunday fast approaching, I did what I always do in this circumstance - I prayed to the Great Baking Master. As I drifted off into a restless sleep, images of Petit Fours danced through my head.

And thus, I woke up with the idea to make an easy (or as easy as they come) petit four recipe. When I presented the vision to my father, who has a decent hand on French, he asked  what petit four means . I googled it and apparently means "tiny oven". Why? Because they were originally made as ovens cooled down and bakers did not want to lose any money, so they would bake things like petit fours. Additionally, a traditional petit four has four layers. 
Enough with the history lesson. Anyways. Many people figure these adorable desserts are too time consuming - but they don't have to be! Most people start with a traditional pound cake, but if you begin with a sheet cake, life is much easier. 
So, here's my adaptation of traditional mini ovens.


For the sheet cake:
3/4 cups butter, softened 
1 1/2 cups white sugar
2 eggs, room temp
1 teaspoons vanilla extract  
1 teaspoons instant coffee granules dissolved in 1/4 cup hot water 
1/2 cup buttermilk 
1 cup all-purpose flour 
1/3 cup unsweetened cocoa powder 
1/4 teaspoon baking powder 

For the icing:
3 cups confectioners’ sugar
1/2 cup water
2 tsps corn syrup
1 1/2 teaspoons vanilla extract
2 ounces chocolate (if you want chocolate icing...) 


Preheat oven to 325 degrees F (165 degrees C). Grease and flour a 10 inch Bundt pan. Mix together the flour, cocoa, baking powder, and salt. Set aside.
In a large bowl, cream together the butter and sugar until light and fluffy. 


Beat in the eggs one at a time, then stir in the vanilla. 


Beat in the flour mixture alternately with the dissolved coffee and buttermilk.


Pour batter into prepared pan. 
Bake in the preheated oven for 60 to 70 minutes, or until a toothpick inserted into the center of the cake comes out clean. 


It took me a minute to realize it reminds me of Mars. Let's take a closer look.

Yup, that's Mars.
 Let cool in pan for 20 minutes, then turn out onto a wire rack and cool completely.

Now it's time for jam! You can use whatever filling you want, but I found this great jar of homemade blackberry jam in my fridge. My brother made it over the summer with his girlfriend. And boy, is it delicious. Plus, what doesn't go good with chocolate? Spread a layer evenly over the surface of the sheet cake.


Once it is all cooled, cut the cake into 3/4 to 1 inch squares. 


Match squares up together,  making two or three layered cakes. If they are two layered, put the jam sides facing each other. If it's three, put two jam sides together, and the third facing into the sandwich, so no jam faces are exposed.


Cake Pops!
And now time to coat! I decided to use up some extra candy melts that I had from making cake pops on Valentine's day. Yum! I just stirred in two tablespoons of canola oil for every cup of candy melts, to make it less viscous. Pinch the top and bottom and dip each of the four sides into melt. Put in a wiring cooling rack over a making sheet for dripping and paint on the top layer. 


Valentine Candy Melts
 Once I ran out, I made a half batch of frosting. Just mix together all the ingredients until it is all smooth. And just as before, gently dip in each side. To make them extra cute, I used some left over fondant and curled together tiny roses.


So much more simple than the traditional recipes, but quick and easy and very cute.


Sunday, February 10, 2013

Homemade Milanos

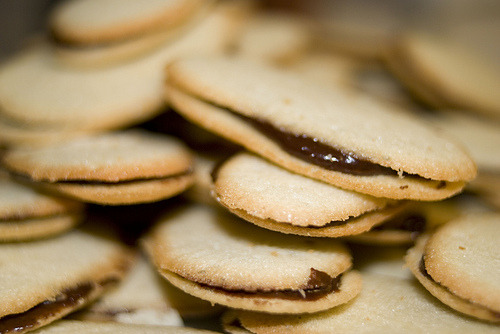
I guess it's imitation weekend. Following the post about the Hostess Cupcake Remakes, my dad suggested I try to make his favorite cookies - Pepperidge Farm Milanos. I was shocked to discover how few people had tried to replicate the recipe before, but I guess going into replication can be nerve-wracking because you know how they are SUPPOSED to taste but you almost certainly won't hit it right on the mark. 
These are a pretty replication, if I am allowed to self-endorse. The cookies are a little crunchier, but I like that. They also definitely have more chocolate, but I don't think anyone can really complain about that. 
These are really easy to whip up. I spent a decent amount of time shaping the cookies, but I was going for appearance. The fun thing about these is you can shape them into whatever you want, so they don't have to be plain old circles or ovals. I'll certainly be aiming to be more creative in the future. Like dinosaurs or sheep or something.

Oven Temp: 325
Prep Time: 40 minutes
Bake Time: 15 minutes
Ready In: 1 hour

2 1/2 cup flour
1 1/3 cup sugar
1 cup butter (2 sticks), room temp
2 eggs
2 tsp vanilla extract
1/2 cup chocolate (milk or semi-sweet)
1/4 cup cool whip


Begin by placing sugar in a bowl and smashing the butter. If you have a mixer that's great, but it's just as easy to do it by hand. I always prefer working with my hands anyways (less dishes to clean!).


Mix in vanilla and egg.


Mix in flour.  I slowly mixed in 1/4 cup of flour at a time.


Mix until dough forms a smooth ball that is soft to the touch.


Cover cookie trays with wax paper. I found several recipes that recommend putting the cookie dough in a plastic bag, and cutting a 3/4" hole at the corner of the bag to pipe out the cookies. I tried it and my bag ended up bursting so I rolled out the rest by hand into ovals and flattened them.  Each cookie should be about 2" long.  Use your finger to flatten out the cookie so you have long flat oval cookies (about 1/4" thick).


Heat your oven to 325 degrees.


Bake for about 15 minutes, until they are golden brown on the bottom.


As they are baking, prepare chocolate. Melt chocolate in a saucepan. Stir in cool whip to thicken. Let the chocolate cool for 5 minutes, stirring once in a while. It should be slightly spreadable. As cookies cool, begin to match up similarly shaped ones. Coat one side with chocolate, and sandwich them together.


I forgot to take enough pictures of the final project, and they were eaten pretty quickly. This is from
http://www.hansenchristiancenter.com/2011/12/01/homemade-milano-cookies/

Saturday, February 9, 2013

Fauxstess Cupcakes (Vegan)

I think we're all hurting a little from Hostess going out of business. People who haven't craved Twinkies in a decade are now feeling the pain worse than ever before. You can purchase boxes online for tens of dollars. I imagine people are stocking up, a lifetime stock because they never go bad. Phrases like "Be the Hostess with the Hostess" have been seen far and wide. Yes, America is hurting.
At the same time, I've been exploring more vegan options in my cooking and baking. One of my sisters was vegan for about a year, so luckily we own a handful of vegan cookbooks. I was perusing through one such cookbook when I encountered a Hostess knock-off recipe and was inspired to create my own version. So, yes, this recipe is vegan, but it also quite closely replicates the flavors of a chocolate Hostess cupcake. 


For Cupcakes:
1 cup flour
1/4 cup cocoa flour
3 tablespoons of the darkest cocoa powder you can fine (if not, just use regular cocoa powder)
 1 tsp baking powder
1/2 tsp baking soda
pinch of salt
1 cup plain soy or rice milk
1/4 canola oil
1/2 maple syrup
1/4 cup sugar
1 tsp apple cider vinegar
2 tsp vanillar

Filling:
1/4 margarine (or SmartBalance)
1/2 cup shortening
3/4 confectioner's sugar
2 tsp vanilla

Chocolate Icing
1/3 cup soy milk
 4 ounces chocolate

White Squiggle Icing
1 cup confectioner's sugar
1 tbls water


Mix together  flour, cocoa powders, baking powder, baking soda and salt. 


In a larger bowl, stir together wet ingredients and sugar until well combined.


Stir in dry ingredients in two parts, mixing gently.  Beat for a minute until well combined.


Line a muffin tin with cupcake wrappers. Heat oven to 350. Scoop out about 1/3 cup batter into each liner. They should be 3/4 of the way full. Bake for 26-30 minutes, until tops are firm.


When they are done they should look like this, but you'll want to work on the frostings in the mean time


As it's baking, you'll want to begin making all three of the frostings. I like to start with the chocolate ganache because it has cooling time.


Bring the soy milk to just a boil. Remove from heat and add in chocolate, stirring constantly until melted.

Begin making the fluffy filling. Beat together the margarine and shortening until very well combined. Add sugar and vanilla and continue beating for a long time until very fluffy. Taste and see if it's yummy. Add more sugar if necessary.
Finally, time for white icing. Mix together confectioner's sugar and water. You want it to be as thick is it can be while still spreadable. Think tooth paste. Add in more sugar or water as needed.
Spoon both white icing and fluffy filling into separate bags. In the fluffy icing bag cut a 1/2 inch hole in the corner. In the white icing cut the smallest hole possible.


Hopefully by now the cupcakes are cooled, but if not, let them cool for 10-15 minutes outside of the tins. To assemble, poke a whole in the center of each cupcake and wiggle around to create a cavern. Fill with fluffy cream.


My army of holey cupcakes
Gently cut the tops off the white fluffy filling to create a smooth cupcake top.


Frost with the chocolate ganache and swirl the white frosting on top.


Ta-da! Homemade Hostess.


Sunday, February 3, 2013

Three-Ingredient Cookies

My dad bought 20 lbs of granola yesterday. We don't eat a lot of granola here. I think it was one of those ideas you get into your head and think "Yeah, that's a good idea. I gotta go and buy 20 lbs of granola now."
About a 8 of the 20 lbs
Needless to say, I've been looking for ways to use up the granola that are quick and yummy. Conveniently, I was talking to my newly veganized friend about what she eats for yumminess. She told me about a two ingredient cookie recipe that I guess has become pretty popular amongst her people recently. Well, you're probably now wondering why my recipe is three ingredients if the original is but two. Because I wanted mine to be yummier! That's why!
The recipe additionally calls for just some plain old oats and some bananas. But I strove to make my healthy concoction as cookie-like as possible. So, as I have done in a handful of other recipes, I pulverized the oats into a flour-like texture to make a smoother cookie.

Oven Temp: 350
Prep Time: 5 minutes
Bake Time: 15 minutes
Ready In: 20 minutes

Ingredients
2 bananas (riper is better)
1 cup of oats
1 tsp vanilla
anything you wish to add (Chocolate!)

Begin by blended the oats into a smooth flour. It was a rare opportunity for me to take out the old magic bullet and give it a whirl. I'm such a sucker for infomercials that I talked my dad into getting me one....rarely use it...

 
Place blended oats in a large bowl to prepare for banana smashing.


Peel bananas. I made a double batch, hence the extra bananas.

 
Begin smashing. I used a butter cutter to start off because my bananas were a little too fresh, and then switched to a fork.


Add in any extras you want (berries, extra sugar, chocolate. Mix thoroughly.
 

Either grease a baking pan really well (because it WILL stick) or cover with parchment paper or wax paper. 


Bake at 350 for 15 minutes. Enjoy hot or cold.