Showing posts with label Pies. Show all posts

Sunday, June 23, 2013

Savory Rhubarb and Onion Pie

Rhubarb has a secret that it's been hiding for many years under layers of sugar and syrups. Rhubarb can be savory.
Game changer. 
Think of the billions of possibilities that have now emerged. The reason it couples so well with sweet things is because cooked rhubarb has a naturally elegant bitterness that will cut the sweetness in a pie - bringing a balance to dessert. So, when you try to make a savory rhubarb dish, you have to make sure to bring a tint of sweetness to provide that balance. Actually, that's the basis behind my theory for today's dish - a little yin-yang sort of thing. We're used to rhubarb being used as a spot of bitterness in a sweet dish. Instead, I wanted to switch the ratio of sweet to bitter so our sweet element (raisins) would be a spot of sweetness in a tart(ish) dish.
I hope I'm not misleading you with all this talk of bitterness. It's not actually a bitter dish! It's salty and sweet and contrasts a nice flaky pie crust with a veggie interior. You have the mild bitter and the satisfying sweetness and, wow, I need to go eat another piece....

Well....I used my favorite pie dough recipe, but you can substitute any old savory pie dough for it (this is not the time to break out the pre-made oreo pie crust).
I wanted to try something new, so I set it up as a pizza sort of thing - flatted the dough unto a sheet and spread out the topping.

Bake Temp: 450 F
Prep Time: 30 minutes
Bake Time: 30 minutes
Ready-In: 1 hour

My Favorite Pie Dough
1 1/4 cup flour
1/2 stick chilled butter, chopped into 8 pieces
1 tbls. apple cider vinegar
3 tbls. cold water

Prepare the pie dough first. Pop the water in the freezer so it will be quite cold by the time you need it. Cut the butter into the flour until it forms a crumbly mixture. Mix in the water and vinegar until the dough comes together. Wrap up and store in the fridge for the time being.

2 medium onions
3 cloves garlic, minced 
1/2 cup vegetable broth
1 tbls oregeno
2 tsp rosemary
2 tsp thyme
1 tsp. pepper
4-5 stalks of rhubard, chopped (about 2 cups)
1/2 - 3/4 cup raisins
1 tbls. butter
1/2  cup hard cheese (I love Parmesan)


Preheat the oven 450 F. I chopped up one onion and set it aside to make a cleaner looking topping before baking. I cut up the other into semi-circles.


The semicircles were sauteed them in the butter until gently golden. I really let them take their time to coax that awesome sweetness out. When the time is right, mix in the garlic and let the flavors combine


 Pour in the broth and 2 tbls oregeno, 1 tsp thyme and 1 tsp rosemary, setting the others aside for later.


  Stir in rhubarb and raisins. Cover and let sit for 4-5 minutes. You want the rhubarb to be cooked and the raisins to be getting plump and juicy. Remove from heat.


Roll out the dough on a lightly flowered surface. I greased a cookie sheet and rolled out the dough to fit perfectly.


 Sprinkle remaining spices and pepper on surface of dough


 Pour the rhubarb mix on top and spread out evenly.


Plop on the diced onions.


Bake at 450 F for 20 minutes. Then, spread the cheese over the top.


  Lower oven temp to 350 (you don't have to wait until it lowers to 350) and make for another 10 minutes.


Sunday, June 2, 2013

Beefy Empanadas

 The elusive pasty truck of St. Paul makes yet another appearance in our lives. This time, my lovely sister Samantha flew in from Minnesota to make a guest star appearance at my graduation and graduation party. As always, her arrival brings a flurry of activity to the kitchen, with my dad making his famous pickles and classic red beet eggs, my older, older sister exciting to have copious amounts of time and baking supplies nearby and Samantha's belligerent request that I make her pasties. It's been fun! 
But, for her arrival, it was time for me to try a recipe that my brother and I made a long time ago. Something so delicious that last time I had them, I ate so many I felt sick. Same thing happened with calzones years ago, and I recently overcame my fear of them too! Anyways, empanadas!


 A dish that can be made sweet or savory to fit your mood! I always like the savory approach to cleanse the baking palate, but here's a slight sweet twist to keep you coming back for more! Some people prefer theirs to be fried, but I found an alarming lack of difference in the outcomes between baked and fried, thus I choose the healthier method to present to you!

Oven Temp: 350 F
Prep Time: 25 minutes +1 hour cooling
Bake Time: 20 minutes
Ready-In: 1 hr 45 minutes

Dough
3 cups flour (plus a little more for kneading)
1 tsp salt
1/2 cup cold water
Flour all your surfaces!
1 egg
1 egg white (save yolk for later)
1 tsp vinegar
3 tbls shortening or softened butter
 
Filling
 1 medium onion, chopped
1/2 raisins
2 tbls brown sugar
1 1/2 ground beef
1 tsp cumin
1 tsp ginger
2 tbls canola oil
1 tsp chives
salt and pepper to taster

Begin by preparing your dough. In a bowl, beat the water, egg, egg white and vinegar together. Set aside. In a separate bowl, mix together the flour and salt.
Cut the shortening or butter into the flour mix until well combined. Make a well in the center of the flour mix and pour the liquid ingredients from the first bowl into the center.
Knead until the dough comes together, then wrap in plastic and refrigerate for at least one hour, but no more than a day.
While the dough is chilling, prepare your filling. I went with a rather nontraditional approach by adding a subtle sweetness using raisins and a little sugar.
Heat the canola oil in a large frying pan. Stir in chopped onions and beef until the meat is cooked through. Mix in raisins,  cumin, ginger and......... Remove from heat. I'm sorry for the lack of photos....raw and cooked ground beef are pretty darn un-photogenic!
Preheat oven to 350. When do is ready, divide into 10 parts. Roll into balls then roll into into 6 to 8 inch circles.


 Scoop filling into half the circle. Fold the opposite edge over and pinch shut with a fork or your fingers.


 Lay on ungreased baking sheet. Using the egg yolk from the dough, mix in equal parts water and gently paint the surface of the empanadas for a nice golden crust.


Bake for about 20 minutes, when the outside because a golden brown. Best served warm.

Monday, April 15, 2013

Mini Mushroom, Arugula and Onion Tarts

 Wooohoooo! School break! My last April break of high school. It's time to do a serious number on my to-do list: Watch Shrek, win a game of chess, let the hedgehog experience the outside world under close supervision, etc. The normal teen stuff. Well, I woke up this morning all excited about this sandwich I envisioned. Picture this:
A pad of butter sizzling in a frying pan, filling the kitchen with the sultry aroma of the start to a great sammich. Gently grating some cheddar cheese, to sprinkle liberally into the pan, melting ever so perfectly. The rough squeeze as you pull together the sides of a garlic pressing, the tiny pieces of garlic landing so perfectly in the pan. Popping two slices of whole grain bread in the toaster before moving to begin slicing up some grilled chicken. Painstakingly choosing the best pieces of arugula, before the toast pops up, you delicately butter one piece.

Arugula: A Zebra Finch's Fancy


Now, watching the cheese smoothly glide unto the bread and the hand-picked arugula landing on top. Finally, the crescendo, you place the chicken and upper piece on toast and give it a finally squeeze. Yum. Sadly, not photogenic whatsoever. I tried. My very best. Oh well.
So, it was time to try again. My dad, good ol' Papa Zim, said he'd been wanting to try something culinarily new with mushrooms. I love me a good pie. I knew we could find a compromise.


Oven Temp: 400 F
Prep Time: 20  minutes
Bake Time: 50 minutes
Ready In: 1 hr 15 minutes

1 cup fat free cottage cheese
1 medium yellow onion
1/2 pound mushrooms (8 ounces), chopped into small pieces
1 egg

2 cups arugula
4 cloves garlic
 2 tsp oregeno
2 tsp thyme
2 tsp rosemary
2 tbls canola or olive oil (for frying)
salt and pepper

Crust
1 1/4 cup flour
1 tbls apple cider vinegar
3 tbls water
1/2 cup butter (1 stick) cold and cubed
red pepper flakes

You'll want to have the crust all ready to go in the fridge as you began to prepare the filling. 
So, cut butter into the flour until it forms a crumbly mix. Keeping in mind that an over worked pie crust is less fluffy, mix water and vinegar into crumbles and work with hands until just combined.


If you want a little flavor boost, stir in some pepper flakes. Seran wrap and place in fridge.


Begin sauteing onions in a large frying pan with the oil over medium heat. When they begin to brown mix in garlic. Mix in mushrooms.


Sizzle until most of the moisture is gone from mushrooms. You'll notice that the pan will soon have more water in it from the mushrooms. Good job!


Once the mushrooms have shrunken, stir in arugula and stir until arugula wilts a little, about 30 seconds to a minute. Remove from heat.


Place cottage cheese in a bowl, stir in the egg. Mix in vegetables. Sprinkle in spices liberally.

Remove dough from fridge. Grease some a muffin tin really well (for the tiniest pies) or a cake pan (for medium) or an ordinary pie pan (large). 


Preheat oven to 400. Press pie into respective pan(s). If you want, sprinkle with red pepper flakes for a flavor boost! Bake the crust until lightly golden (about 10 minutes for smallest, or 15 for the bigger ones). Remove, let cool. If needed, gently press down the crust if it became too puffy during the baking. Pour in the filling.


 Bake for about 40 minutes at 400.


Ta-da! A petite pie!

Sunday, February 24, 2013

Luxurious Low(er)-Fat Cheese Cake

 Cheesecake. A romantic, tantalizing dessert. I remember the time I ate at Cheesecake Factory. I died of happiness. Unfortunately I had a State Cross Country meet the next morning so they had to revive me. But it was amazing. Surprisingly I didn't eat any cheesecake, so I can't praise their work. But if it was half as good as the rest of the food, man oh man....
Well, I've never made cheesecake. I love cheesecake but I know, even as someone who never counts calories, that this dish can destroy a diet. It just so happened that one of the best recipes I found (from foodnetwork) was low fat. I was intrigued. I couldn't believe you could get anywhere close to that dream taste while subbing the ingredients....
Well. Turns out you can! Ta-Da!

Bake Temp: 325
Prep Time: 20 minutes
Bake Time: 50 minutes
Cool/Sit Time: 3 hours
Ready-In: 4 hours
  
For Crust
12 whole sheets graham crackers
3 tablespoons granulated sugar
3 tablespoons water
2 tablespoon melted unsalted butter
For Filling
3 ounces semisweet chocolate
24 ounces 1 percent cottage cheese
8 ounces 1/3 less fat cream cheese, at room temperature
3/4 cup granulated sugar
1/2 cup unsweetened cocoa powder
2 tablespoons all-purpose flour
1 egg
2 egg whites
2 tsps vaniller
Begin with your crust. To make a nice cheese cake you're going to want a very special kind of pan. It's got this fancy old spring release thing on the side, so the wall comes off and your cheesecake will just appear when ready.
 Look how nice and fancy that is! I'd really recommend one if you want to make a respectable cheesecake.

So. For the crust. Begin by heating your oven to 325. Gosh, that's low, you might say. Well, the lower the better. Longer bake time means a more moist filling. Anyways,  blend your graham crackers until they resemble nothing less than a powdery fairy dust.


Then mash in the other three crust ingredients. Butter the sides of your pan. Push the crumble into the bottom evenly.


 Place in the fridge to harden and cool. In the meantime make the filling. The crust needs at least 15 minutes to sit, so keep that in the back of your mind.
This is real simple. I promise. Take out your biggest blender (the magic bullet ain't gonna cut it here). Blend the bejeezus out of the cottage cheese. You want the smoothest, silkiest puree you can get.  Now blend in the cream cheese, sugar, cocoa powder and flour. Prepare your egg white. Dump in and blend until smoooooooooooth.


When the crust is ready, having chilled for at least 15 minutes, pour filling into crust evenly.


Microwave the semi-sweet chocolate until melted. Gently pour over the top of the cake. I made a straight line, then ran a toothpick through it to make my design.


 Fill a casserole dish 1/2 way with water, put on lower shelf. This will serve to keep your cake nice and moisturized through the baking.
 

 Bake at 325 for 45-55 minutes. Be VERY mindful not to over bake. It will continue baking once it has been removed from the oven, so you want the center to still be jiggly. After 45-55 minutes, with a center still jiggly, turn off oven but LEAVE THE CAKE INSIDE! YEAH. For one hour. NOW you can remove it. Run a knife around the edge of the pan to loosen everything up. Let sit for 2 hours, then put in fridge until desired munching time.

 Decorate as you please, I recommend strawberries and raspberries!


Be careful of munching papa's.


Sunday, November 25, 2012

Sweet (and Savory) Potato Pie

Keeping a careful eye on the butter
With a continuous supply of sweet potatoes at the ready, I knew it was about time that I begin baking with those bad boys again. This time I wanted to take a pie approach, as you should often due when faced with a surplus of sugary vegetables. As you may very well know by now, I prefer my desserts chocolate and my pies savory.
This recipe comes from a little fellow I know. He is a pretty big fan of root vegetables and I'm sure he'd enjoy cheese if it didn't upset his tummy so. He was in charge on monitoring the butter to make sure it was at the ideal temperature for everything that was made this weekend. He did an excellent job and I think I shall have to keep him on the task force.

This is a super adaptable recipe for whatever you taste preference is. My palate prefers gingery-garilcky flavors so I made sure to add a lot of them into this.

Bake Temp: 350 F
Prep Time: 20 minutes
Bake Time: 40 minutes
On the Table In: 1 hour

Pie Crust
1 1/4 cup flour
1/2 cup butter (1 stick), cold and chopped into 1/2 cubes
1 tbls apple cidar vinegar
3 tbls cold water (stick in freezer right now and it will be perfect!)

Filling
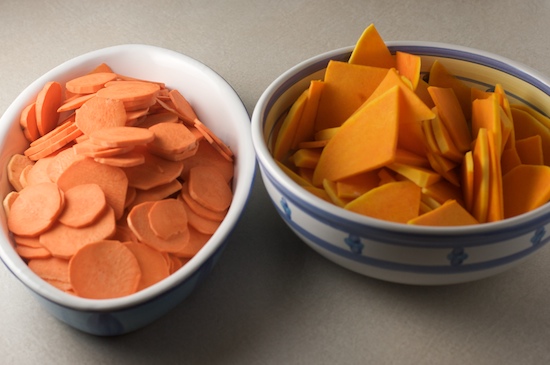
4-5 smaller sweet potatoes, peeled and sliced vertically to make circles
the top part of a butternut squash chopped into quarters
1 tbls chopped chives
1 tbls onion powder
1 tps cilantro
1 tbls ground ginger
2 cloves garlic, smooshed
1/3 cup sour cream
1 tsp lemon juice
1 1/2 cup cheese (cheddar is good)

Begin by making your pie dough. Cut butter into flour until it forms a thin crumble. mix in vinegar and water. Mix (preferably by hand) until dough comes together. Seran wrap and put in fridge.
Now make the filling. Steam the sweet potatoes and squash for 5 minutes.
How to Steam:
Place a metal strainer in a pot. Fill water about half an inch over the bottom of the strainer. Salt  lightly. Place vegetables in. Heat up until water boils, cover and let steam for 5 minutes.
Good job.


Remove veggies from steamer. Sprinkle with chives, onion, cilantro, ginger and garlic. Mix gently so as not to smoosh anything.

In a separate bowl mix together sour cream and lemon juice. Set aside.

At this point the kitchen smelled pretty darn good, although that may be due in part to the crepes I was making for breakfast in the background. Mmmmm....nothing like Sunday Morning Crepes...


Take out your pie dough and split into two balls. One should be slightly smaller than the other. Roll out larger ball into a circle shape. Lay gently into pie dish (about 10 inch diameter) Make sure to have a little overhang. Because this is a relatively dry pie, you don't need to bake the bottom part ahead of time.

A lil overhang
 Layer half the vegetable glop. Pour in the cheese. Layer the other half of veggie stuff. Pour the sour cream and lemon juice on top.

Roll out the second layer of pie dough. It should form a smaller circle. I like to sprinkle this with salt and pepper on one side. Plop the dough on top of everything. Using the overhang from the bottom pie dough, wrap to the upper pie dough and pinch together to form a nice tight seal.


Cut the pie dough so gas and liquid can be released during the baking.

 Bake at 350 for 35 minutes. Turn up oven to 500 for the last five minutes for a nice golden brown on top.


For a little bonus beauty in your day - our Christmas cactus has bloomed for the first time in many many years: