
They are a time commitment, they do not require much actual work, but because of the butteryness of the dough, the must be refrigerated between handling, so there is a lot of downtime between handling periods.
These buttery/chocolate cookies are cookies from my childhood. We used a similar dough to make pinwheel cookies and baked them on sticks to make a cookie-pop kind of thing.
 | |
| Tis the season! |
Oven Temp - 350
Bake Time - 12 minutes
Prep Time - 45 minutes plus 6-36 hours of chilling
Total Time - usually 10 hours
 |
| The goal of today's recipe |
1 tsp baking powder
1 tsp salt
1 lb (2 cups or 4 sticks) unsalted butter, at room temperature
2 cups granulated sugar
1 tbsp pure vanilla extract
2 large eggs, at room temperature
½ cup unsweetened cocoa powder
Let me say this - I know it's a gross amount of butter, BUT this is a recipe for 8 dozen cookies, so keep that in mind when you are waiting for the pound of butter to soften properly.
Divide the dough in two. Knead the cocoa powder into one half of the dough. Divide each flavor in half for four total balls of dough, two chocolate and two vanilla.
 |
| Smooth inside, few bubbles are good |
Form each into a rectangle, wrap in plastic, and refrigerate for 2 hours.

Take one portion of chocolate and one portion of vanilla out of the fridge. On a lightly floured surface, with a floured rolling pin, roll out the vanilla dough into a 12″ by 5″ rectangle. Cut the rectangle into nine strips, each 1/2″ thick. Repeat the process with the chocolate dough.
Now comes the tricky part (or at least the part that makes these look super fancy) - Form two checkerboard logs: delicately alternate chocolate and vanilla strips to form a three by three square. One log should go: vanilla chocolate vanilla, chocolate vanilla chocolate, vanilla chocolate vanilla. The other log should be chocolate vanilla chocolate, vanilla chocolate vanilla, chocolate vanilla chocolate. Press into the sides to make it as even a square as possible. Wrap with parchment paper or plastic wrap and chill for 2 hours.
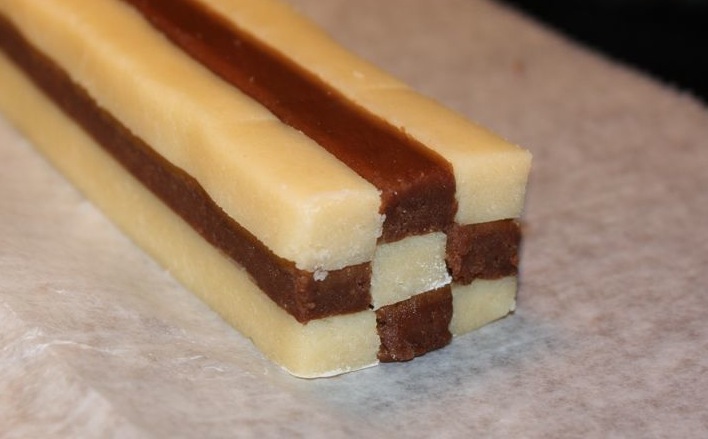
Afterwards, roll the remaining vanilla portion into a rectangle of 12″ by 6″. Take the log with 4 strips of vanilla and wrap the dough around it to form an even border.

Roll the log to press it in and define the corners. Repeat with the chocolate dough and the remaining log. Wrap the logs in parchment or plastic and refrigerate well, preferably overnight. This is a good breaking point. You can freeze them for later use of store them in fridge for a while.

When you’re ready to bake, preheat the oven to 350F. Using a very sharp knife, slice the cookie-dough log into ¼-inch thick slices.
 |
| My favorite part- so satisfying! |
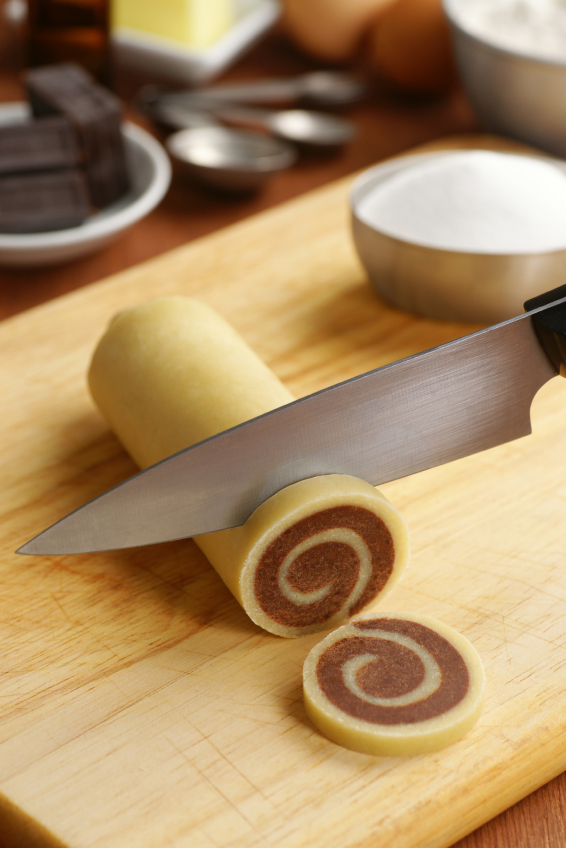 |
| I found I had extra dough, so I just did the simple, classic pinwheel design as well |
Place on the prepared baking sheet leaving about 1 inch all way around them. Bake the cookies, in batches, for about 12 minutes until firm and golden brown on the bottom. Don’t let them bake for too long, or the color contrast between the chocolate and vanilla dough will be lost.Sit back and prepare to hear admiration!
 |
| As you can see, not my picture, sorry! |
No comments:
Post a Comment