Showing posts with label Cookies. Show all posts

Sunday, April 21, 2013

Better Than Store- or Homemade M&M Cookies

I've been reading a lot of Harry Potter lately. Or, I suppose I ought to say re-reading. No....that's still not right. Something along the lines of re-re-re-re-re-re-re-re-re-re-reading. Yeah. Prior to the second part of the seventh movie coming out, I reread the entire series to get my head in the game. However, once I saw the movie, I knew I'd have to take a long time off of reading the books- both to mourn the final end and to give myself a little time to forget some of the details in the books so that when I did inevitably go back and read them again, I'd be able to discover a few new levels of magic. Luckily, I have a terrible terrible memory, so the anticipated 5 years of no Harry Potter became less than 2 years! Woohoo! One has very few occasions to enjoy a poor memory, but this is surely one of them.
Anyways, this seemingly has very little to do with this weeks recipe. And, indeed, that is true. However, I am on school break this week so that has been part of what has been occupying my time. Now, the reason this ties in to the cookies is because I spent some time sorting the m&m's by color. It's one of those strange things I really enjoy doing. I like sorting coins and things by color. You're probably thinking, oh she's just a little OCD. No. I'm not. I am the youngest of four and I am the sole reason my house is messy. I once went three years without cleaning my room and it was so messy there were drifts of junk. Three foot tall heaps. But I'm not like that anymore! While still messy, I no longer am on the National Hoarder List. 
And now you're dying to know - what does being a non-OCD pleasure sorter and Harry Potter fan have to do with cookies?
Well. When I started sorting the m&m's by color, I said outloud to our zebra finch, Billie "Let the sorting begin!" and she began squawking excitedly. So. There you have it.


Prep Time: 10 minutes
Chill Time: 30-90 minutes
Bake Time: 10 minutes
Ready In: 50-110 minutes

1 cup brown sugar
1/2 cup white sugar
1 cup butter, softened
2 eggs, at room temp
1 1/2 teaspoons vanilla extract
2 1/2 cups all-purpose flour
1 teaspoon baking soda
1 bag of m&m's


As always, for best results of  cookies, you want the ingredients to all be at room temperature. However, I know sometimes you don't have much warning. So, I would recommend taking the eggs out as soon as you begin and give them as much time to warm as possible. For the butter, I'll just chop it up (into about tablespoon sized hunks) and microwave for 20 seconds to soften it. 


That seems to do that job pretty well, especially if you take the time to put the dough in the fridge prior to baking.

So, in a large bowl, mix sugars and butter until smooth. 
Stir in eggs and vanilla and mix thoroughly. Add flour, and baking soda to creamed mixture.  
Blend well. 
You can approach the m&m's one of two ways. You can add 3/4 cup of M&M candies right now if you want just random patterns or you can wait until after the dough is chilled to make specific designs. I wanted to write things out on the top of mine, so I did the second way. Either way, chill the dough for 30-90 minutes. Longer is always better, but if you're in a rush, you do what you have to do. 


Preheat oven to 350. Lightly grease your baking sheets. For the random m&m method, drop dough by teaspoonful onto cookie sheet. Slightly push a few candies on top of each dough ball with remaining candies. For designed method, roll dough into balls and flatten out. Press m&m's into desired formation.  
 

Bake at 350 degrees F for 9 to 11 minutes until very lightly golden at the edges.
 

Sunday, March 3, 2013

Healthy Fudgy Chocolate Cookies

You can't even tell these can beans in them. It's incredible. You can't taste the whole wheat flour either. WHHHHHHHHHHAAAAAAAAAAATTTTTT. These are so good.... Fudgey, kind of a brownie like consistency. No eggs, so you can eat the raw batter. AND these are exceptionally easy. 10 minute prep, 10 minute break, ready to eat in 25. I wish I had more to say about these, but gosh, I think I've said enough!

1 can black beans
2 T. milk
1.5 T. peanut butter
2 T. olive oil
3 T. whole wheat flour
¼ c. unsweetened cocoa powder
½ c. + 1 T. sugar
1 t. baking powder
1 tbls vanilla extract
chocolate chips

Bake Temp - 375
Prep Time- 10
Bake Time - 10
Ready to eat in - 25 minutes

Preheat oven to 375 and line a large baking sheet with parchment paper.
Wash black beans carefully.


Combine black beans, milk, peanut butter, and olive oil in a food processor and process until smooth.


Add in whole wheat flour, cocoa powder, sugar, baking powder, vanilla, salt, and cinnamon, and continue processing until combined and mousse-like.


Spoon 16 dollops evenly spaced dollops of the batter onto the baking sheet and sprinkle with the extra chocolate chips.


Press chocolate chips into the top. 
Bake for 10 minutes.
Following baking, I sprinkled on some fleur de sal.


Let cool slightly, then put on a baking rack until they are cooled completely.


Sunday, February 10, 2013

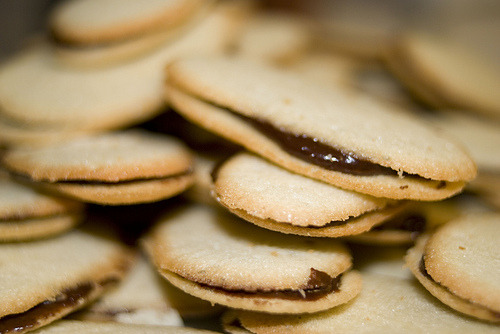
Homemade Milanos

I guess it's imitation weekend. Following the post about the Hostess Cupcake Remakes, my dad suggested I try to make his favorite cookies - Pepperidge Farm Milanos. I was shocked to discover how few people had tried to replicate the recipe before, but I guess going into replication can be nerve-wracking because you know how they are SUPPOSED to taste but you almost certainly won't hit it right on the mark. 
These are a pretty replication, if I am allowed to self-endorse. The cookies are a little crunchier, but I like that. They also definitely have more chocolate, but I don't think anyone can really complain about that. 
These are really easy to whip up. I spent a decent amount of time shaping the cookies, but I was going for appearance. The fun thing about these is you can shape them into whatever you want, so they don't have to be plain old circles or ovals. I'll certainly be aiming to be more creative in the future. Like dinosaurs or sheep or something.

Oven Temp: 325
Prep Time: 40 minutes
Bake Time: 15 minutes
Ready In: 1 hour

2 1/2 cup flour
1 1/3 cup sugar
1 cup butter (2 sticks), room temp
2 eggs
2 tsp vanilla extract
1/2 cup chocolate (milk or semi-sweet)
1/4 cup cool whip


Begin by placing sugar in a bowl and smashing the butter. If you have a mixer that's great, but it's just as easy to do it by hand. I always prefer working with my hands anyways (less dishes to clean!).


Mix in vanilla and egg.


Mix in flour.  I slowly mixed in 1/4 cup of flour at a time.


Mix until dough forms a smooth ball that is soft to the touch.


Cover cookie trays with wax paper. I found several recipes that recommend putting the cookie dough in a plastic bag, and cutting a 3/4" hole at the corner of the bag to pipe out the cookies. I tried it and my bag ended up bursting so I rolled out the rest by hand into ovals and flattened them.  Each cookie should be about 2" long.  Use your finger to flatten out the cookie so you have long flat oval cookies (about 1/4" thick).


Heat your oven to 325 degrees.


Bake for about 15 minutes, until they are golden brown on the bottom.


As they are baking, prepare chocolate. Melt chocolate in a saucepan. Stir in cool whip to thicken. Let the chocolate cool for 5 minutes, stirring once in a while. It should be slightly spreadable. As cookies cool, begin to match up similarly shaped ones. Coat one side with chocolate, and sandwich them together.


I forgot to take enough pictures of the final project, and they were eaten pretty quickly. This is from
http://www.hansenchristiancenter.com/2011/12/01/homemade-milano-cookies/

Sunday, February 3, 2013

Three-Ingredient Cookies

My dad bought 20 lbs of granola yesterday. We don't eat a lot of granola here. I think it was one of those ideas you get into your head and think "Yeah, that's a good idea. I gotta go and buy 20 lbs of granola now."
About a 8 of the 20 lbs
Needless to say, I've been looking for ways to use up the granola that are quick and yummy. Conveniently, I was talking to my newly veganized friend about what she eats for yumminess. She told me about a two ingredient cookie recipe that I guess has become pretty popular amongst her people recently. Well, you're probably now wondering why my recipe is three ingredients if the original is but two. Because I wanted mine to be yummier! That's why!
The recipe additionally calls for just some plain old oats and some bananas. But I strove to make my healthy concoction as cookie-like as possible. So, as I have done in a handful of other recipes, I pulverized the oats into a flour-like texture to make a smoother cookie.

Oven Temp: 350
Prep Time: 5 minutes
Bake Time: 15 minutes
Ready In: 20 minutes

Ingredients
2 bananas (riper is better)
1 cup of oats
1 tsp vanilla
anything you wish to add (Chocolate!)

Begin by blended the oats into a smooth flour. It was a rare opportunity for me to take out the old magic bullet and give it a whirl. I'm such a sucker for infomercials that I talked my dad into getting me one....rarely use it...

 
Place blended oats in a large bowl to prepare for banana smashing.


Peel bananas. I made a double batch, hence the extra bananas.

 
Begin smashing. I used a butter cutter to start off because my bananas were a little too fresh, and then switched to a fork.


Add in any extras you want (berries, extra sugar, chocolate. Mix thoroughly.
 

Either grease a baking pan really well (because it WILL stick) or cover with parchment paper or wax paper. 


Bake at 350 for 15 minutes. Enjoy hot or cold.


Sunday, January 13, 2013

Brownie Roll-Out Cookies

These are my absolute favorite cookies ever. I don't think there is anything I could do to make these cookies better. I got the recipe, once again, from the Smitten Kitchen Cookbook. This recipe was SO GOOD, that it is also on her website and can be found right here.
My sister made these for the first time last week, and I fell in love. I don't know if anything, be it a fulfilling career, a happy marriage or child proteges, could offer me more than these. I think I could make them every week and be happy. 
I'm not a heart girl either. I don't wear heart-shaped necklaces or earrings. I don't like heart cut-out dresses. I'd rather make food that looks anatomically correct than make heart cut-outs. But these cookies are deserving of all of that cheesy love. So hearts galore. I also made a robot, but that was for my beautiful sister Sammy.

 
1 cup butter
3 cups all-purpose flour
1/2 teaspoon salt
1/2 teaspoon baking powder
1 1/2 cups sugar
2 large eggs
1 teaspoon vanilla extract
2/3 cup unsweetened cocoa


First things first - we've got to brown the butter. I began by setting up a double boiler of sorts to ,melt it down then transferred the butter to a pan to begin the browning. The thing about browning is that it happens really quickly, so quickly in fact, that at can quickly go from brown to burnt in seconds. While some recipes call for blackened butter, buerre noir, it usually adds just an acidic flavor.


Heat the butter until it starts to boil, whisking constantly and turns a light tan color. Remove from heat immediately and let cool until luke warm.


Too crumbly! Need milk!
 Whisk dry flour, salt and baking powder in bowl and set aside. Mix butter, sugar, eggs, vanilla and cocoa in mixer. Gradually add flour mixture, and mix until smooth. I knead mine a little at this stage because it always seems extremely crumbly. If you need, you may wish to add in a little milk to smooth it together (I use about 1/4 of a cup max.)


 Roll out cookie dough on well-floured counter. Cut into desired shapes, brushing extra deposits of flour off the top. (It does disappear once baked, though, so don’t overly fret if they go into the oven looking white.) Bake on a parchment-lined baking sheet for 8 to 11 minutes, depending on thickness. I believe 1/4 in is recommended.
 Every time you re-roll the dough, I recommend lightly flouring your counter.


Bake on a sheet lined with parchment paper or a well greased pan.


Once baked, transfer unto a wire rack and cool.


These are perfect for milk. Another house favorite is warming them in the microwave for 15-20 seconds and eating with whipped cream on top.


Sunday, December 2, 2012

Mandelbrot (Jewish Biscotti)

My best friend is Italian. I'm Jewish. Needless to say our relationship is entirely built on a shared love of food. Yet, all of our worst arguments are squabbles over taste preference and priorities. He finds my lack of interest in pasta sauce to be insulting, my addiction to chocolate frightening and my indifference to pizza outright revolting. And I argue that it's not that I DON'T like pasta sauce, I just hate to glob it on. And chocolate is the perfect palate cleanser. And I do like pizza from time to time, I just never crave it, gosh darn it.
In fact, no matter what, our conversations always seem to digress into rants about the college search process, our discrepancies in food preference and how much he hates cold (I'm pro-winter). Yesterday was a busy day in the Zimmerhouse. With finals week quickly approaching, my father and were using the kitchen like nobody's business. My dad found this recipe in the King Arthur's cookbook. It seemed perfect. Some classic Italian with a Jewish twist. The perfect cookie to appease both me and my friend. It's pretty cool - you get to double bake them. It made me feel super professional and advanced, even though it was a VERY simple recipe. 


If you look carefully, you can see the FOUR different kinds of cookies that were baked yesterday
With snow finally falling on the ground, many a mind turns toward the perpetual hope in a snow day. Luckily, my sister and had something even more wintery to look forward - an annual Hot Chocolate 5K. Having only done it once in the past 4 years, and my time 10 minutes slower than I run these days, I had no expectations. So, she and I decided to dress up and make it a fun run.


Prep Time: 25 minutes
Bake Time: 28 then 25 minutes
Oven Temp: 350 then 300
Total Time: 4 hours and 30 minutes

3 large eggs
1 cup vegetable oil
1 cup sugar
1 teaspoon vanilla extract 
1 teaspoon salt
3 1/2 cups flour
1 teaspoon baking powder 
2 cups chocolate chips

1 cup toffee chips*

*These can be found in the chocolate chip section of your grocery store - I used the Heath brand

 Beat together the eggs, oil, sugar, vanilla, and salt at medium-high speed until thickened and light-colored, about 5 minutes.
Beat in the flour and baking powder.
Mix in the chips. Cover and refrigerate for 3 hours, or overnight. Preheat the oven to 350°F. Lightly grease (or line with parchment) two baking sheets.
Divide the dough into four even pieces, about 13 ounces each if you have a scale.
Working with one piece at a time, place the dough on the prepared baking sheet, shaping it into an 8" x 2" log. Repeat with the remaining pieces of dough, leaving at least 2" between them; you'll put 2 logs on each baking sheet.
Sprinkle the logs heavily with coarse white sugar, if desired.
Bake the logs for about 28 to 30 minutes, until they're set and beginning to brown and the edges and sides, but not brown all over. Remove them from the oven, and reduce the oven temperature to 300°F.  Allow them to cool for 10 minutes.
Cut each log into 1/2" to 3/4" slices. Cutting them on the diagonal will make the mandelbrot longer; cutting them crosswise will yield shorter cookies.

Place the pieces on edge, quite close together, on the baking sheets, and return them to the oven.
Bake for an additional 35 to 45 minutes, until a cookie feels baked through when you pinch it between your fingers. You'll also notice some browning around the edges, though the cookie shouldn't be browning all over. The point is simply to bake them all the way through.
Remove from the oven, and cool the mandelbrot right on the baking sheets.